Unit testing basics
테스트 하는 방법으로 먼저 인터프리터가 있지만, 이는 비효율적입니다.
DataCamp-Unit Testing for Data Science in Python
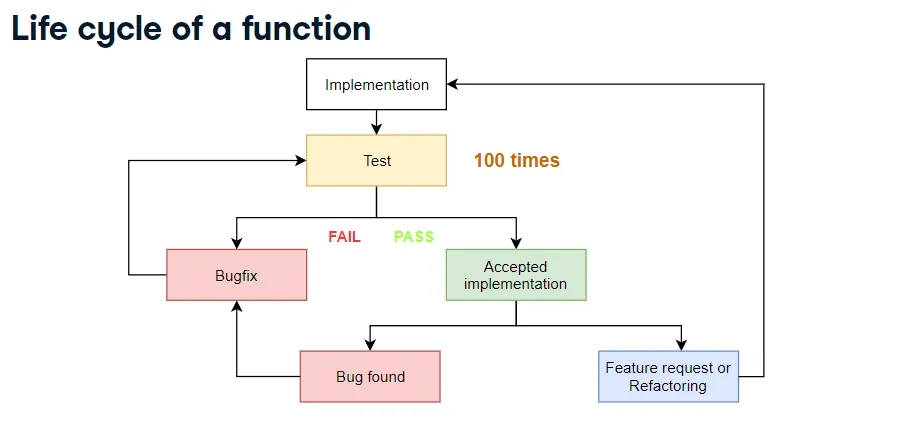
이러한 생의 주기가 100번넘게 반복되고 있습니다.
area (sq. ft.)	price (dollars)
2,081	314,942
1,059	186,606
	293,410
1,148	206,186
1,463238,765
다음과 같이 area 이후 탭 price를 가진 구조에서, 만약 오류로 인해 area가 생략되거나 탭이 누락된 경우
def row_to_list(row):
...| Argument | Type | Return value |
|---|---|---|
| ”2,081\t314,942\n” | Valid | [“2,081”,“314,952”] |
| “\t293,410\n” | Invalid | None |
| ”1,463238,765\n” | Invaliid | None |
다음과 같은 경우 None을 반환해야합니다.
row_to_list("2,081\t314,942\n")
[output]
["2,081", "314,942"]

row_to_list("\t293,410\n")
[output]
None

row_to_list("1,463238,765\n")
[output]
None
다음이 잘 작동하는지 직접 실험을 해야하는 과정을 가집니다. (이러한 방법은 너무 많은 시간을 소요)
이러한 시간을 줄이기 위해서 유닛테스팅은 데이터사이언티스트에게 필수 기술입니다.
Python unit testing libraries
- pytest
- unittest
- nosetest
- doctest
pytest
- 사용하기 쉽다
- 가장 인기있는 테스트 라이브러리
- 모든 본질적인 피처를 가진다.?
Step 1. Create a file
test_row_to_list.py 라는 파일을 만든다.
test_ 로 시작하는 파일 이름을 발견하면 다음과 같이 이해하면됩니다.
-> 이것은 일반적인 파이썬 파일이 아니라, 유닛테스트를 포함하는 특별한 파일입니다.
유닛테스트를 포함하는 파일을 테스트 모듈이라고 합니다.
Step2. Imports
test_row_to_list.py
Step3. Unit tests are Python functions
import pytest
import row_to_list

def test_for_clean_row():
유니테스트는 테스트 모듈처럼 이름이 test_ 로 시작하는 python 함수로 작성됩니다.
| Argument | Type | Return value |
|---|---|---|
| ”2,081\t314,942\n” | Valid | [“2,081”,“314,942”] |
Step4. Assertsion
assert boolearn_expression

assert True
[output]

assert False
[output]
Traceback (most recent call last):
    File "<stdin>", Line 1, in <module>
AssertionError
assert 문에는 모든 부울 표현식이 될 수 있는 필수 첫번째 인수가 잇습니다.
assert 문이 True일 경우 통과되어 아무것도 출력되지 않습니다.
import pytest
import row_to_list

def test_for_clean_row():
    assert row_to_list("2,081\t314,942\n") == ["2,081", "314,942"]
위와 같은 경우, 해당 함수를 실행했을 때 값이, 다음과 같은 값을 반환하는지 확인 ( True 가 반환되어 통과 )
만약 False가 있을경우, 즉 함수에 버그가 있으면 assert 문은 AssertionError를 발생시키고 테스트는 실패
import pytest
import row_to_list

def test_for_clean_row():
    assert row_to_list("2,081\t314,942\n") == ["2,081", "314,942"]

def test_for_missing_area():
    assert row_to_list("\t293,410\n") is None

def test_for_missing_tab():
assert row_to_list("1,463238,765\n") is None| Argument | Type | Return value |
|---|---|---|
| ”2,081\t314,942\n” | Valid | [“2,081”,“314,942”] |
| “\t293,410\n” | Invalid | None |
| ”1,463238,765\n” | Invalid | None |
변수값이 None인지 확인하는 방법은 다음과 같습니다.
assert var is None # O

assert var == None # X
== 를 사용하는 것이 아니라 is 를 사용함을 주목
Step5. Running unit tests
pytest test_row_to_list.py
Unit tests for row_to_list()
import pytest
import row_to_list

def test_for_clean_row():
    assert row_to_list("2,081\t314,942\n") == ["2,081", "314,942"]

def test_for_missing_area():
    assert row_to_list("\t293,410\n") is None

def test_for_missing_tab():
    assert row_to_list("1,463238,765\n") is None
코드를 보면, import row_to_int 가 선언되어있음을 알 수 있습니다.
행 영역 데이터가 누락 된 행 및 탭 구분 기호가 누락 된 행을 각각 정리합니다.
!pytest test_row_to_list.py를 입력하면, 많은 정보가 쏟아져 나옵니다.
Section 1: general information

운영 체제, Python 버전, pytest패키지 버전, 작업 디렉토리 및 pytest 플로그인 정보가 출력
Section 2: Test result

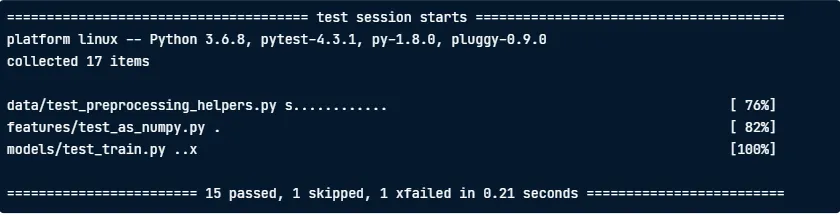
출력에 “collected 3 items” 가 표시되며, 이는 pytest가 실행할 테스트 3개를 찾았음을 의미
그 아랫 줄에는, test_row_to_list 인 테스트 모듈 이름이 포함되어있습니다.
| Character | Meaning | When | Action |
|---|---|---|---|
| F | Failure | An exception is raised when running unit test | Fix the function or unit test. |
| . | Passed | No exception raised when running unit test | Everything is fine. Be happy! |
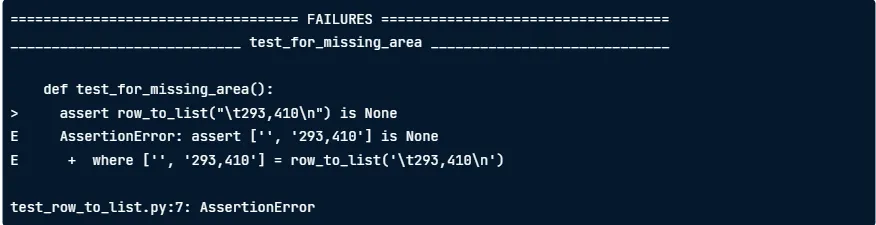
def test_for_missing_area():
    assert row_to_list("\t293,410") is none # AssertionError from this line
다음과 같은 코드를 실행시킬때 가장 자주 발생합니다.
단위 테스트 코드를 실행하는 동안 다른 예외가 발생하면 단위 테스트가 실패 할 수도 있습니다.
(위의 예시에서는 None 을 none 이라고 표기해서 에러가 발생)
. 는 assert 문이나 단위 테스트의 다른 부분에서 예외가 발생하지 않았음을 의미
위의 경우 .F. 임을 통해 첫번째와 세번째는 통과하였지만, 2번째에서 오류가 발생했음을 알 수 있습니다.
Section 3: Information on failed tests
다음 섹션에서는 실패한 테스트에 대한 자세한 정보가 포함되어 있습니다.
예외를 발생시키는 줄은 >를 통해 표기됩니다.
E로 표시된 다음 줄에는 예외에 대한 세부 정보가 포함되어 있습니다.
where는 assert문을 실행할 때 계산 된 모든 반환 값을 표시합니다.
Section 4 : Test result summary

마지막 줄은, 결과를 요약하여 보여줍니다.
Unit tests 장점
-
유닛테스트는, 시간 절약을 시켜줍니다.
-
유닛테스트는 이처럼, 함수가 하는 일에 대한 좋은 힌트를 제공하여 함수의 코드를 더 빨리 이해하는데 도움을 줍니다.
-
또한, 이는 실제 상황을 모방하기 위해 일부 연습에서는 테스트 모듈을보고 함수의 작업을 추측하도록 요청할 수 도 있습니다.
-
유닛테스트는 사용자가 단위 테스트를 실행하고 기능이 작동하는지 확인할 수 있으므로, 패키지에 대한 신뢰도를 높입니다.
-
유닛테스트는 생산적인 시스템의 downtime을 줄일수 있습니다. (CI를 통해 유닛테스트를 실행하고 유닛테스트가 실패하면, 변경을 거부하여 다운 타임을 방지)
Unit이란 무엇일까?
- 작은 독립적인 코드
- Python 함수 또는 클래스
Mastering assert statements
assert boolean_expression, message

assert 1==2, "One is not equal to two!"

[output]
Traceback (most recent call last):
    File "<stdin>", line1, in <module>
AssertionError: One is not equal to two!
다음과 같이 , message 내용을 같이 사용할 수 도있습니다.
import pytest

def test_for_missing_area_with_message():
    actual = row_to_list("\t293,410\n")
    expected = None
    message = ("row_to_list('\t293,410\n') "
              "returned {0} instead"
              "of {1}".format(actual, expected)
              )
    assert actual is expected, message
다음과 같이 코드를 사용하면 됩니다.

이렇게 사용할 시, 하단에는 메시지와 함께 수정 된 것을 실행합니다.
(이렇게하면, 자동출력보다, 오류메세지를 이해하는데 훨씬 수월하다. )
0.1+0.1+0.1 ==0.3
[output]
False

0.1+0.1+0.1
[output]
0.3000000000004
다음과 같이 파이썬 코드는 원하는대로 작동하지 않을수도 있습니다. (파이썬의 부동 방식 때매)
assert 0.1+0.1+0.1 == 0.3, "Usual way to compare does not always work with floats!"assert 0.1+0.1+0.1 == pytest.approx(0.3)pytest.approx() 는 오른쪽 끝에 있는 숫자가 무시되고, 부동 소수점을 안전하게 비교할 수 있습니다.
assert np.array([0.1+0.1, 0.1+0.1+0.1]) == pytest.approx(np.array([0.2,0.3]))import pytest
def test_on_string_with_one_comma():
return_value = convert_to_int("2,081")
assert isinstance(return_value, int)
assert return_value == 2081함수가 정수를 반환하는지 테스트하는 코드를 예를 들어보면, instance() 함수를 이용합니다. 인수 두번쨰로는, 예상 유형(int)를 입력,
반환 값이, 예상 값과 일치하는지는, 또 다른 assert 문으로 작업을 수행
Testing for exceptions instead of return values
import numpy as np
example_argument = np.array([[2081, 314942],
                           	[1059, 186606],
                           	[1148, 206186],
                            ]
                           )
split_into_training_and_testing_sets(example_argument)

[output]
(array([[1148, 206186],
      	[2081, 314942],
       ]
      )
array([[1059, 186606]])
)
다음 함수는 2차원 배열을 75%를 train에 25%를 test에 전달하는 함수입니다.
import numpy as np
example_argument = np.array([2081, 314942, 1059, 186606, 1148, 206186])
split_into_training_and_testing_sets(example_argument)
1차원 배열을 전달하게 되면, ValueError가 발생됩니다. 이를 이제 오류 메세지와 함께 표시하기 위해 다음과 같은 코드를 사용합니다.
def test_valueerror_on_one_dimensional_argument():
    example_argument = np.array([2081, 314942, 1059, 186606, 1148, 206186])
    with pytest.raises(ValueError):
        split_into_training_and_testing_sets(example_argument)
함수가 예상대로 ValueError를 발생 시키면 침묵이되고, 테스트가 통과됩니다.
ValueError가 발생하지 않으면, 컨텍스트 관리자가 실패 예외를 발생시켜 테스트가 실패합니다.
def test_valueerror_on_one_dimensional_argument():
    example_argument = np.array([2081, 314942, 1059, 186606, 1148, 206186])
    with pytest.raises(ValueError) as exception_info:
        split_into_training_and_testing_sets(example_argument)
    assert exception_info.match("Argument data array must be two dimentional."
                               "Got 1 dimensional array instead!"
                               )
as 절을 사용하여 with문을 확장하면 컨텍스트내에서 valueError가 발생하면, exception_info에는 침묵 된 ValueError에 대한 정보가 포함됩니다.
The well tested function
이전에 split_into_training_and_testing_sets 를 생각하면
| Number of rows (argument) | Number of rows (training array) | Number of rows (testing array) |
|---|---|---|
| 8 | int(0.75 * 8) = 6 | 8 - int(0.75 * 8) = 2 |
| 10 | int(0.75 * 10) = 7 | 10 - int(0.75 * 10) = 3 |
더 많은 케이스를 테스트할 수록, 함수가 제대로 작동하고 있다는 확신을 가질 수 있습니다. 하지만 시간상의 문제로 더 많은 테스트를 할 수 없습니다.
Test argument types
- Bad arguments
- Special arguments
- Normal arguments
다음과 같이, 타입을 나눠서 테스트하면 함수를 더 잘 테스트할 수 있습니다.
Type 1: Bad arguments(one dimensional array)
| Argument | Type | Num rows(training) | Num rows (testing) | exceptions |
|---|---|---|---|---|
| One dimensional | Bad | - | - | ValueError |
Example: np.array([845.0, 31036.0, 1291.0, 72205.0])
다음과 같이 잘못된 인자 타입이 들어왔을 땐, ValueError를 출력할 것입니다.
Type 2: Special arguments
- Boundary values.
- For some argument values, function uses special logic
Type 3: Normal arguments
마지막으로, 나쁘지도 특별하지도 않는 정상값을 테스트
Test Driven Development (TDD)
유닛테스트가 중요하지만, 현실에서는, 작성을 건너 뛰는 것이 너무 일반적입니다.
- Feature development.
- Unit testing
유닛테스트의 우선순위가 다른것보다 뒤쳐지기 때문에, 미루다가 결국 작성하지 않게됩니다.
이를 방지하기 위해서는, 함수가 코드로 구현되기 전에도 테스트를 작성하는 것입니다.
- Step 1. Write unit tests and fix requirements
- Step 2. Run tests and watch it fail
- Step 3. Implement function and run tests again
How to organize a growing set of tests?
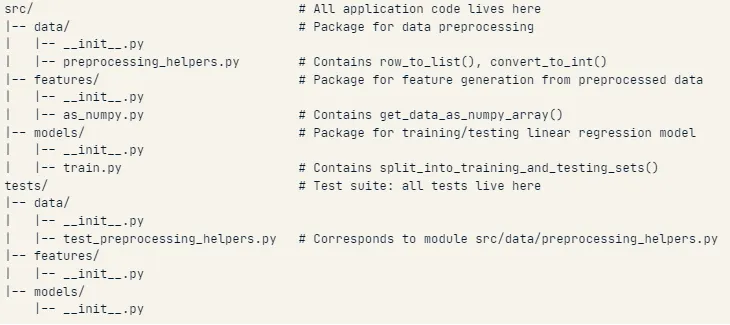
테스트 파일을 다음과 같이 구성해서 하는 것이 효율적
Test class : theoretical structure
import pytest
from data.preprocessing_helpers import row_to_list, convert_to_list

class TestRowToList(object):
    def test_on_no_tab_no_missing_value(self):
        ...
    def test_on_two_tabs_no_missing_value(self):
        ...

class TestConvertToInt(object):
    def test_with_no_comma(self):
        ...
    def test_with_one_comma(self):
        ...
함수형으로 하는 방법보다 class형으로 하는 것이 더 효율적임.
Mastering test execution
이전에 테스트 클래스를 선언했었는데, 테스트 클래스는 특정 함수에 대한 유닛 테스트를 위한 컨테이너일 뿐입니다.
pytest는 테스트 폴더에 포함 된 모든 테스트를 실행하는 쉬운 방법을 제공합니다.
cd test
pytest
단지 이렇게 실행하면됩니다.
이 명령은 작업 디렉토리의 하위 트리로 반복하여 테스트를 자동으로 검색합니다.
-
이름이 “test_” 로 시작하는 모든 파일을 테스트 모듈로 식별합니다.
-
테스트 모듈 내에서 이름이 “Test” 로 시작하는 클래스를 테스트 클래스로 식별합니다.
-
각 테스트 클래스 내에서 “test_“로 시작하는 이름을 가진 모든 함수를 단위 테스트로 식별합니다.

다음과 같이, 실행하면, 유닛테스트 실행결과가 출력됩니다.
pytest -x 다음 명령어를 사용하면 실패후 pytest를 종료합니다.
만약 특정 pytest만 실행하고싶으면, 해당 경로를 지정해주면됩니다.
pytest data/test_preprocessing_helpers.py
Node ID
- Node ID of a test class:
<path to test module>::<test class name> - Node ID of a unit test:
<path to test module>::<test class name>::<unit test name>
Running tests using node ID
pytest data/test_preprocessing_helpers.py::TestRowToList
이러한 방법을 더 빠르고 유연하게 하는 방법은 키워드 표현식입니다.
The -k option
- Run the test class
TestSplitIntoTrainingAndTestingSets
pytest -k "TestSplitIntoTrainingAndTestingSets"
pytest -k "TestSplit"
pytest -k "TestSplit and not test_on_one_row"
Expected failures and conditional skipping
실패를 예상하는 유닛테스트를 구현하는 방법으로는 xfail이 있습니다.
import pytest

class TestTrainModel(object):
    @pytest.mark.xfail
    def test_on_linear_data(self):
        ...
pytest 를 실행하면, 하나의 테스트가 xfailed임을 알 수 있습니다.

이는 잘 파이썬 버전, 특정 플랫폼에 따라 잘 작동하지 않을수도 있습니다.
import sys

class TestConvertToInt(objcet):
    @pytest.mark.skipif(sys.version_info > (2,7), reason="requires Python 2.7")
    def test_with_no_comma(self):
        """Only runs on Python 2.7 or lower"""
        test_argument = "756"
        expected = 756
        actual = convert_to_int(test_argument)
        message = unicode("Expected: 2081, Actual: {0}".format(actual))
assert actual == expected, message-
다음과 같이 독스트링을 통해 표시하는 것을 권장
-
skipif 데코레이터를 이용해서 파이썬 버전이 맞지않은 경우 패스
pytest -r 을 사용하면 reason을 보여지게 합니다.
pytest -r[set_of_characters]
pytest -rs s를 추가하면 끝 부분에 있는 짧은 테스트 요약 섹션에서 건너 뛴 테스트가 표시
pytest - rx x를 추가하면 테스트 요약 정보의 이유를 표시
pytest -rsx 또한 가능
Continuous integration and code coverage
깃헙등에 뱃지를 다는 방법
Step 1. Create a configuration file
- Contents of
.travis.yml
language: python
python:
	- "3.6"
install:
	- pip install -e.
script:
	- pytest tests
Step 2. Push the file to Github
git add .travis.yml
git push origin master
Step 3. Install the Travis CI app
- 깃헙에서 Travis CI를 검색하고 클릭
- 앱을 설치
- 필요한 저장소 또는 조직에 대한 앱 엑세스를 허용
- 깃헙 계정을 사용하여 로그인해야하는 Travis CI로 리디렉션
이러한 과정을 걸치면 깃헙 README 에 뱃지가 추가됨
-------- Codecov 생략 ------------
Beyond assertion: setup and teardown
assert문 이상이 필요한 함수를 살펴봅니다.
def preprocess(raw_data_file_path, clean_data_file_path):
    ...
다음 함수는 데이터 파일 및 깨끗한 파일에 대한 경로를 인자로 받습니다.
1,801	201,411
1,767565,112
2,002	333,209
1990	782,911
1,285	389129
다음과 같은 데이터를 전달해야 할 때, 두번 째 행에는 탭구분 기호가 없습니다.
이를 row_to_list() 를 통해서 걸러냅니다. 이후 convert_to_int() 가 적용됩니다.
4, 5번째 행을 보면, 각각 쉼표가 없기에, 더럽다고 판단됩니다. convert_to_int() 는 이를 필터링합니다.
1801	201411
2002	333209
두개의 유효한 행에 대해 convert_to_int()는 쉼표로 구분된 문자열을 정수로 변환합니다.
preprocess() 는 제대로 작동하기 위한 전제조건이 있기 때문에 다른 함수랑은 다릅니다.
- environment 에 raw 데이터 파일이 존재해야합니다.
- 함수를 호출 할 때 깨끗한 데이터 파일을 만들어 environment를 수정합니다.
이 과정을 test_on_raw_data() 로 만들면 다음과 같습니다.
def test_on_raw_data():
    # Setup: create the raw data file
    preprocess(raw_data_file_path, clean_data_file_path)
    with open(clean_data_file_path) as f:
        lines = f.readlines()
    first_line = lines[0]
    assert first_line = "1801\t201411\n"
    second_line = lines[1]
    assert second_line == "2002\t333209\n"
    # Teardown: remove raw and clean data file
The new workflow
Old workflow
- assert
New workflow
- setup -> assert -> teardown
Fixture
import pytest

@pytest.fixture
def my_fixture():
    # Do setup here
    yield data # return 대신 yield 사용
	# Do teardown here
def test_something(my_fixture):
...
data = my_fixture
...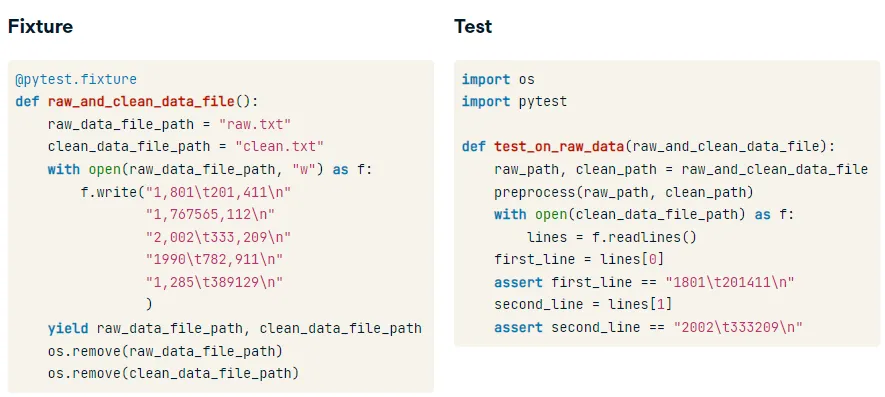
Fixture과 test를 비교하면 다음과 같습니다.
tmpdir pytest fixture
이것은, 설정 중에 임시 디렉토리를 생성하고 분해 중에 임시 디렉토리를 삭제합니다.
@pytest.fixture
def raw_and_clean_data_file(tmpdir):
    raw_data_file_path = tmpdir.join("raw.txt")
    clean_data_file_path = tmpdir.join("clean.txt")
    with open(raw_data_file_path, "w") as f:
        f.write("1,801\t201,411\n"
               "1,767565,112\n"
               "2,002\t333,209\n"
               "1990\t782,911\n"
               "1,285\t389129\n"
               )
    yield raw_data_file_path, clean_data_file_path
Mocking
이전에 버그가 있으면, preprocess()에 버그가 없더라도 preprocess() 에 대한 테스트가 통과되지 않았습니다.
mocking을 위해서는 두가지의 라이브러리가 필요합니다.
pytest-mock: Install usingpip install pytest-mockunittest.mock: Python standard library package
Mocking 의 기본 개념은 잠재적으로 대체하는 것입니다. 모조품을 만들어 오류가 난 것을 대체합니다.
def test_on_raw_data(raw_and_clean_data_file, mocker):
    raw_path, clean_path = raw_and_clean_data_file
    row_to_list_mock = mocker.patch("data.preprocessing_helpers.row_to_list",
                                   row_to_list_mock.side_effect = row_to_list_bug_free)
    preprocess(raw_path, clean_path)
    assert row_to_list_mock.call_args_list == [
        call("1,801\t201,411\n"),
        call("1,767565,112\n"),
        call("2,002\t333,209\n"),
        call("1990\t782,911\n"),
        call("1,285\t389129\n"),
    ]
def row_to_list_bug_free(row):
return_values = {
"1,801\t201,411\n": ["1,801", "201,411"],
"1,767565,112\n" : None,
"2,002\t333,209\n" : ["2,002", "333,209"],
"1990\t782,911\n" : ["1990", "782,911"],
"1,285\t389129\n" : ["1,285", "389129"]
}
return return_values[row]Testing models
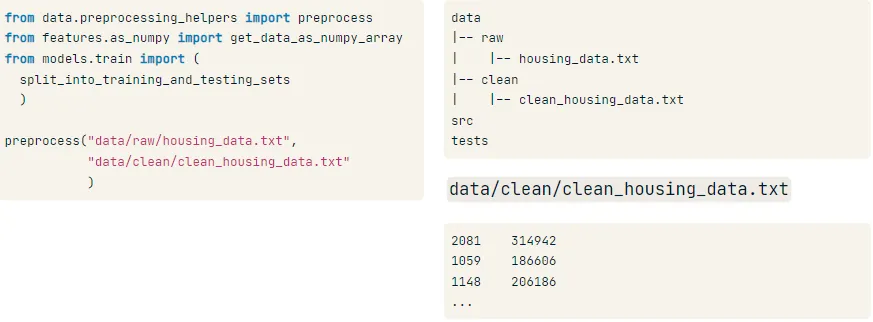
다음과 같이 파일을 위치시킵니다.
from data.preprocessing_helpers import preprocess
from features.as_numpy import get_data_as_numpy_array
from models.train import (split_into_training_and_testing_sets)

preprocess("data/raw/housing_data.txt",
          "data/clean/clean_housing_data.txt")
data = get_data_as_numpy_array("data/clean/clean_housing_data.txt",2)

get_data_as_numpy_array("data/clean/clean_housing_data.txt",2)

trainning_set, testing_set = (split_into_training_and_testing_sets(data))
다음 과정들을 걸친 데이터가 잘 학습까지 완료되었습니다.
from scipy.stats import linregress

def train_model(training_set):
	slope, intercept, _, _, _ = linregress(training_set[:, 0], training_set[:,1])
    return slope, intercept
Trick 1: Use dataset where return value is known
import pytest
import numpy as np
from models.train import train_model
def test_on_linear_data():
    test_argument = np.array([[1.0, 3.0],
                              [2.0, 5.0],
                              [3.0, 7.0]
                             ]
                            )
    expected_slope = 2.0
    expected_intercept = 1.0
    slope, intercept = train_model(test_argument)
    assert slope == pytest.approx(expected_slope)
    assert intercept == pytest.approx(expected_intercept)
Trick 2: Use inequalities
import numpy as np
from models.train import train_model
def test_on_positively_correlated_data():
    test_argument = np.array([[1.0, 4.0],
                              [2.0, 4.0],
                              [3.0, 9.0],
                              [4.0, 10.0],
                              [5.0, 7.0],
                              [6.0, 13.0],
                             ]
                            )
    slope, intercept = train_model(test_argument)
    assert slope > 0
from data.preprocessing_helpers import preprocess
from features.as_numpy import get_data_as_numpy_array
from models.train import (split_into_training_and_testing_sets, train_model)
preprocess("data/raw/housing_data.txt","data/clean/clean_housing_data.txt")
data = get_data_as_numpy_array("data/clean/clean_housing_data.txt", 2)
training_set, testing_set = (split_into_training_and_testing_sets(data))
slope, intercept = train_model(training_set)Testing model performance
def model_test(testing_set, slope, intercept):
    """Return r^2 of fit"""
Plotting function
def get_plot_for_best_fit_line(slope, intercept, x_array, y_array, title):
"""
slope: slope of best fit line
intercept: intercept of best fit line
x_array: array containing housing areas
y_array: array containing housing prices
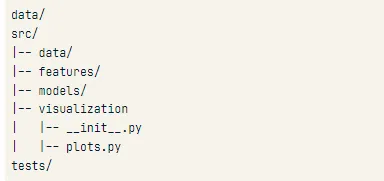
"""다음 plots.py를 위의 사진처럼 경로를 설정하는 것이 효율적
training/testing plot
from visualization import get_plot_for_best_fit_line
preprocess(...)
data = get_data_as_numpy_array(...)
training_set, testing_set = (split_into_training_and_testing_sets(data))
slope, intercept = train_model(training_set)
get_plot_for_best_fit_line(slope, intercept,
                           training_set[:, 0], training_set[:, 1],
                           "Training")

get_plot_for_best_fit_line(slope, intercept,
                           testing_set[:, 0], testing_set[:, 1],
                           "Testing")
pytest-mpl
pip install pytest-mpl 를 통해서 install
example
import pytest
import numpy as np
from visualization import get_plot_for_best_fit_line
def test_plot_for_linear_data():
    slope = 2.0
    intercept = 1.0
    x_array = np.array([1.0, 2.0, 3.0])# Linear data set
    y_array = np.array([3.0, 5.0, 7.0])
    title = "Test plot for linear data"
return get_plot_for_best_fit_line(slope, intercept, x_array, y_array, title)!pytest -k "test_plot_for_linear_data" --mpl-generate-path visualization/baseline!pytest -k "test_plot_for_linear_data" --mpl