Because most of my workloads run on managed services like EKS and GKE, I rarely think about provisioning Kubernetes myself. That changed when I needed an on-demand cluster (and wanted hands-on practice for the CKA exam). I followed the guide Install Kubernetes with kubeadm and documented the process here.

Instead of bare-metal hardware I used AWS EC2 instances. Note: the control plane must have enough memory—if it drops below ~1.7 GB kubeadm init fails—so I provisioned t3.medium instances (2 vCPU / 4 GB RAM).
Base Setup for Each Instance
SSH into every node. If you authenticate with a .pem key, adjust its permissions first:
chmod 600 <pem_key_name>
Connect:
ssh -i <pem_key_name> ubuntu@<public_ip>
Set the timezone to KST and update the hostname on each machine:
sudo -i

rm -f /etc/localtime
ln -s /usr/share/zoneinfo/Asia/Seoul /etc/localtime
date  # should show KST

hostnamectl hostname k8s-control-plane
Repeat for the worker nodes with names like k8s-worker1, k8s-worker2, etc.
Add the hostnames to /etc/hosts so nodes can reach each other:
vi /etc/hosts

127.0.0.1   localhost localhost.localdomain localhost4
172.31.159.93 k8s-control-plane
172.31.31.224 k8s-worker1
172.31.40.253 k8s-worker2
Reconnect to verify the hostname changes, then test connectivity from each worker:
ping -c 2 k8s-control-plane
Enable IPv4 forwarding by configuring the necessary kernel modules and sysctl values:
cat <<EOF | sudo tee /etc/modules-load.d/k8s.conf
overlay
br_netfilter
EOF

modprobe overlay
modprobe br_netfilter

cat <<EOF | sudo tee /etc/sysctl.d/k8s.conf
net.bridge.bridge-nf-call-iptables  = 1
net.bridge.bridge-nf-call-ip6tables = 1
net.ipv4.ip_forward                 = 1
EOF

sysctl --system
(Optional) Useful Checks
cat /etc/os-release
lscpu
free -h
hostname
ip addr

# Firewall status (should be inactive)
ufw status

# Swap status (should be empty)
swapon -s
Install a Container Runtime
Since dockershim is deprecated, containerd is the preferred runtime, though cri-dockerd remains an option.
Containerd
apt update
apt install apt-transport-https ca-certificates curl gnupg lsb-release -y

curl -fsSL https://download.docker.com/linux/ubuntu/gpg | sudo gpg --dearmor -o /usr/share/keyrings/docker-archive-keyring.gpg

echo "deb [arch=amd64 signed-by=/usr/share/keyrings/docker-archive-keyring.gpg] https://download.docker.com/linux/ubuntu $(lsb_release -cs) stable" | sudo tee /etc/apt/sources.list.d/docker.list > /dev/null

apt update
apt install containerd.io -y

mkdir -p /etc/containerd
containerd config default | sudo tee /etc/containerd/config.toml
Edit /etc/containerd/config.toml:
vi /etc/containerd/config.toml
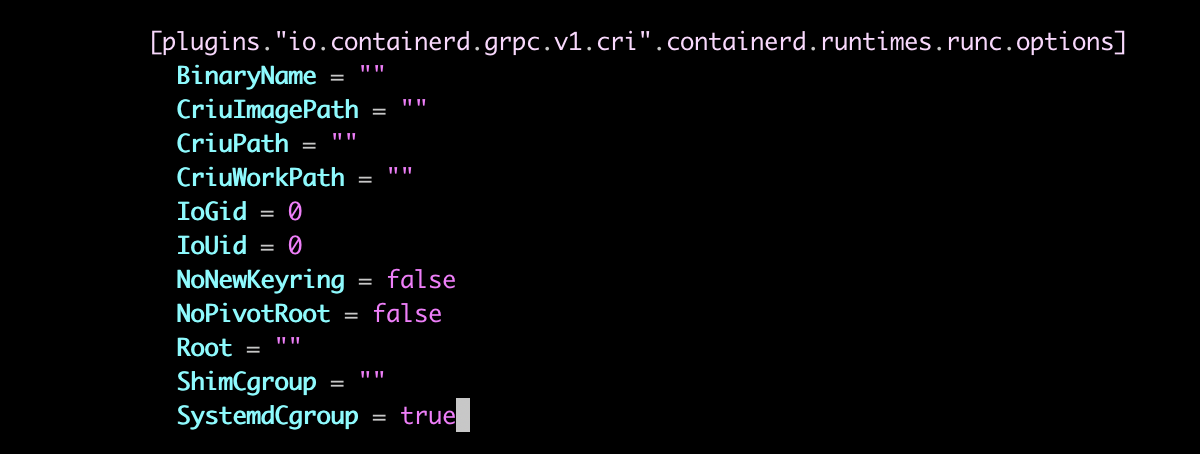
Set SystemdCgroup = true under plugins."io.containerd.grpc.v1.cri".containerd.runtimes.runc.options, then restart containerd:
systemctl restart containerd
systemctl status containerd
ls -l /run/containerd/containerd.sock
cri-dockerd (Alternative)
apt update
apt install -y docker.io
systemctl enable --now docker
systemctl status docker

wget https://github.com/Mirantis/cri-dockerd/releases/download/v0.3.0/cri-dockerd_0.3.0.3-0.ubuntu-bionic_amd64.deb
dpkg -i cri-dockerd_0.3.0.3-0.ubuntu-bionic_amd64.deb
systemctl status cri-docker
ls /var/run/cri-dock
Install kubeadm, kubelet, and kubectl
These tools bootstrap and manage the cluster. Follow the official docs:
apt update
apt install -y apt-transport-https ca-certificates curl

curl -fsSLo /usr/share/keyrings/kubernetes-archive-keyring.gpg \
  https://packages.cloud.google.com/apt/doc/apt-key.gpg

echo "deb [signed-by=/usr/share/keyrings/kubernetes-archive-keyring.gpg] \
  https://apt.kubernetes.io/ kubernetes-xenial main" | sudo tee /etc/apt/sources.list.d/kubernetes.list

apt update
apt install -y kubelet=1.26.0-00 kubeadm=1.26.0-00 kubectl=1.26.0-00
apt-mark hold kubelet kubeadm kubectl
Initialize the Control Plane
Run the following on the control-plane node. Choose the appropriate CRI socket for your runtime:
# Containerd
kubeadm init --pod-network-cidr=192.168.0.0/16 --cri-socket unix:///var/run/containerd/containerd.sock

# cri-dockerd
kubeadm init --pod-network-cidr=192.168.0.0/16 --cri-socket unix:///var/run/cri-dockerd.sock
Copy the kubeadm join ... command displayed at the end—it will be used when adding workers.
Configure kubectl for the ubuntu user:
mkdir -p $HOME/.kube
cp -i /etc/kubernetes/admin.conf $HOME/.kube/config
chown $(id -u):$(id -g) $HOME/.kube/config
Optionally save the join command to a file and append the --cri-socket flag:
vi token.join

kubeadm join <public-ip> --token <token> \
  --discovery-token-ca-cert-hash <hash> \
  --cri-socket unix:///var/run/containerd/containerd.sock
Install Calico (CNI)
Immediately after initialization kubectl get nodes shows NotReady because no CNI plugin is installed. Deploy Calico:
kubectl create -f https://raw.githubusercontent.com/projectcalico/calico/v3.24.1/manifests/tigera-operator.yaml
kubectl create -f https://raw.githubusercontent.com/projectcalico/calico/v3.24.1/manifests/custom-resources.yaml
Wait for the pods to come up:
kubectl get pods -n calico-system
kubectl get nodes
For additional Calico tooling:
curl -L https://github.com/projectcalico/calico/releases/download/v3.24.1/calicoctl-linux-amd64 -o calicoctl
chmod +x calicoctl
mv calicoctl /usr/bin

cat <<'END' > ipipmode.yaml
apiVersion: projectcalico.org/v3
kind: IPPool
metadata:
  name: default-ipv4-ippool
spec:
  blockSize: 26
  cidr: 192.168.0.0/16
  ipipMode: Always
  natOutgoing: true
  nodeSelector: all()
  vxlanMode: Never
END

calicoctl apply -f ipipmode.yaml
calicoctl get ippool -o wide
Join Worker Nodes
Run the (modified) join command on each worker:
kubeadm join <public-ip> --token <token> \
  --discovery-token-ca-cert-hash <hash> \
  --cri-socket unix:///var/run/containerd/containerd.sock
Verify:
kubectl get nodes -o wide
Helpful Extras
-
Enable kubectl autocompletion:
source <(kubectl completion bash) echo "source <(kubectl completion bash)" >> ~/.bashrc -
Allow the non-root
ubuntuuser to run kubectl:mkdir -p ~ubuntu/.kube cp -i /etc/kubernetes/admin.conf ~ubuntu/.kube/config chown -R ubuntu:ubuntu ~ubuntu/.kube exit # back to ubuntu user source <(kubectl completion bash) echo "source <(kubectl completion bash)" >> ~/.bashrc
With that the self-managed cluster is ready. Managed services are certainly easier, but building one from scratch deepens your understanding.